
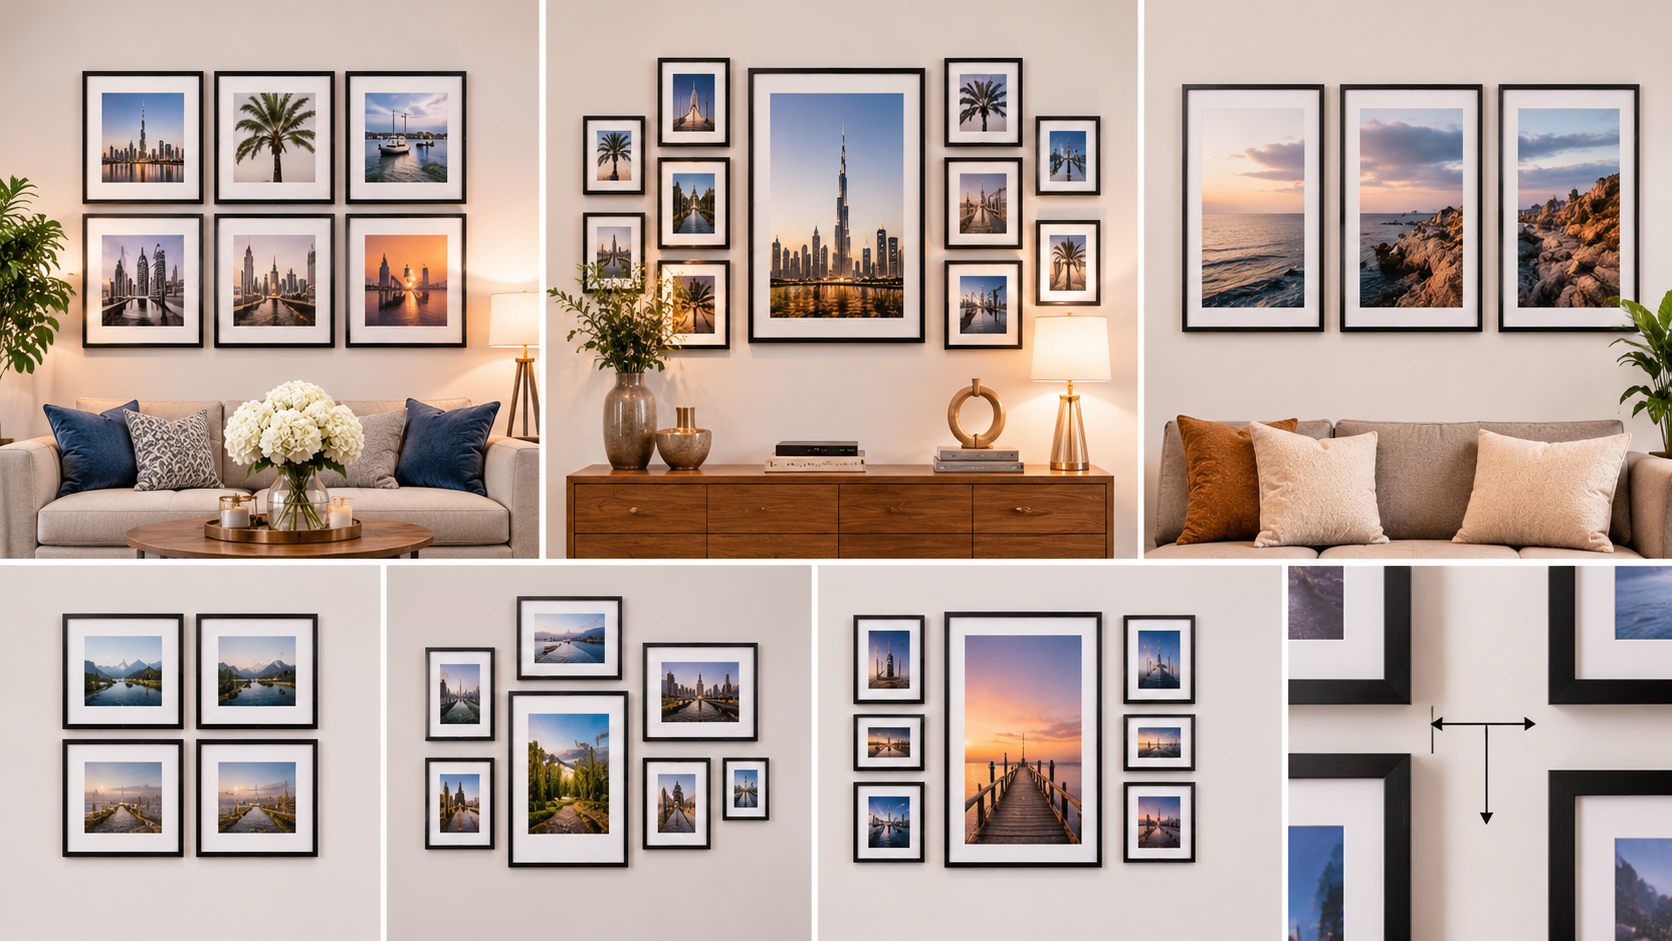
To arrange photo frames on a wall, start with a paper template for every frame and tape them up before drilling. Keep gaps of about 5 to 8 cm between frames, centre the group at 145 to 150 cm from the floor, and make it roughly two-thirds the width of the furniture below. Choose one layout: a grid for a tidy look, a salon style for a collected look, or a single line for halls. For photo framing Dubai homes enjoy, matching frame colours make any layout look planned.
Most gallery walls go wrong at the same moment: someone hammers the first nail before the plan exists. Frames end up crooked, gaps drift wider and the wall is full of holes. The good news is that great picture framing displays follow simple rules, and good photo framing Dubai homeowners achieve is mostly arithmetic and paper, not artistic talent.
This guide shows you the main layouts, the spacing numbers that make them work, a step-by-step template method and a worked example you can copy. For the wider overview of choosing frames, see pickframes..
The Spacing Rules That Make Any Layout Work
|
Measurement |
Rule of thumb |
|
Gap between frames |
About 5 to 8 cm (2 to 3 inches), kept identical throughout |
|
Centre height |
About 145 to 150 cm from the floor, lower in dining areas |
|
Group width over furniture |
Roughly two-thirds the width of the sofa, bed or console |
|
Distance above furniture |
About 15 to 25 cm between furniture top and lowest frame |
|
Distance from corners and ceilings |
At least 15 to 20 cm, so the wall does not feel crowded |
These are guidelines, not laws. The most important rule is consistency: whichever gap you choose, repeat it everywhere, because the eye notices uneven spacing faster than it notices a slightly wrong size.
Five Wall Layouts and When to Use Them
1. The grid
Identical frames in rows and columns, edges perfectly aligned. It is the easiest layout to get right and the most modern. Use it for a series of related photos such as travel shots or a year in pictures. Matching sizes and one frame colour are essential.
2. The salon wall
Mixed sizes arranged organically around a central, larger piece. It feels collected and personal, and it suits living rooms with plenty of wall space. Keep the frame finish consistent so the variety in size does not become chaos.
3. The single line
Three to five frames in one straight row, either centred on a shared midline or aligned along the top edge. It suits hallways, above a console or along a staircase.
4. The statement and satellites
One large frame, such as 24x36, flanked or surrounded by smaller ones. It gives the eye a place to land and works well above a sofa or bed.
5. The staircase rise
Frames climb at the angle of the stairs, keeping the same distance from the steps. Villas and duplex homes often have staircases that suit this arrangement perfectly.
A Worked Example: Sizing a Grid Above a Sofa
Numbers make planning easy. Imagine a 200 cm sofa. Two-thirds of its width is about 133 cm, so your frame group should be about that wide. Here is what a grid of six frames in two rows of three would measure with a 6 cm gap, using the approximate outer size of each frame.
|
Frame size |
Frame width and height (cm) |
Group width (3 across) |
Group height (2 rows) |
|
8 x 10 inch |
About 20 x 25 |
About 72 cm |
About 56 cm |
|
11 x 14 inch |
About 28 x 36 |
About 96 cm |
About 78 cm |
|
16 x 20 inch |
About 40 x 50 |
About 132 cm |
About 106 cm |
Only the 16x20 grid reaches the target width, so that is the size to choose for this wall. Remember to use the real outer size, including the frame and mount, because a frame labelled 16x20 measures larger on the wall. This is also where custom frames help, since you can specify a size that lands exactly on your target.
How to Arrange Frames Step by Step: The Paper Template Method
1. Choose your layout and frame count. Decide whether you are building a grid, salon wall or line.
2. Cut paper templates. Trace each frame on brown paper or newspaper, cut it out and mark where the hanging point sits.
3. Test on the floor first. Lay the templates out and photograph the arrangement, so you can recreate it.
4. Tape them to the wall. Use painter’s tape, step back, and adjust until the spacing feels right.
5. Mark the nail positions. Push a pin through the hanging point on each template, then remove the paper.
6. Hang from the centre outwards. Start with the anchor frame, then work outward with a spirit level.
How to Find the Right Nail Position
Hanging frames from wire is the point where many walls go wrong, because the nail is not where the top of the frame will be. Use this simple method.
7. Decide where the top of the frame should sit on the wall, for example 167 cm from the floor.
8. Pull the wire taut and measure from the top of the frame to the wire.
9. Add that distance to the top position. If the wire sits 5 cm below the top, the nail goes at 172 cm.
Two hooks and a flat hanging bar make large frames more stable than a single hook, and they stop frames drifting out of level.
Photo Framing Dubai: Layout Tips for Dubai Homes
• Long walls: apartment living rooms often have wide, clean walls, so wider layouts such as a long line or a three-column grid suit them.
• Double-height spaces: villas benefit from vertical arrangements and larger anchor frames that fill the height.
• Bright windows: use anti-reflective or UV-protective glass on frames that face strong light.
• Rentals: check your tenancy rules before drilling, and consider fewer, larger frames to keep holes to a minimum.
• Wall type: hollow and concrete walls need different plugs, especially for heavier frames.
Choosing Frames That Make Layouts Easier
The frames themselves can make or break an arrangement. Matching frame colour and moulding width let you mix sizes freely, while a consistent mount width gives photos of different sizes the same visual weight. If your photos are all different shapes, mounts can even them out: a small print in a wide mat and a larger one in a narrow mat can occupy the same outer size.
Common Wall Arrangement Mistakes to Avoid
• Hanging too high, which makes the group float away from the furniture.
• Uneven gaps, which look sloppy even when the frames are aligned.
• Mixing too many frame colours and finishes.
• Making the group too small for the wall or furniture.
• Skipping the template step and re-drilling.
Ordering Matching Frames Online
Online photo framing in Dubai makes it easy to build a set that works together. You can choose the same frame, mount and glazing for every piece, vary the sizes for a salon wall and preview each design before paying. With online custom framing in Dubai, you can also enter exact dimensions to match your plan, instead of adjusting your plan to whatever sizes exist on a shelf. Order the whole set together so the finish is consistent, and allow a few weeks before any occasion.
Why Choose PickFrames for Photo Framing in Dubai?
PickFrames lets you design your frames online and review a live preview before you commit. Browse our custom photo frame collection for style ideas, or start framing your photo and build a matching set for your wall. If you are planning a larger arrangement, tell the team the wall size and layout, and they can help you choose frame sizes that fit.
Frequently Asked Questions About Arranging Photo Frames
How do I arrange photo frames on a wall?
Cut paper templates for each frame, tape them to the wall, adjust until the spacing feels right, then mark the nail positions. Keep gaps of 5 to 8 cm and centre the group at about 145 to 150 cm from the floor.
How far apart should picture frames be on a wall?
About 5 to 8 cm (2 to 3 inches) between frames. Choose one gap and keep it identical throughout the arrangement.
How high should a gallery wall be hung?
Centre the group at about 145 to 150 cm from the floor. Above a sofa or bed, leave about 15 to 25 cm between the furniture and the lowest frame.
What is the easiest gallery wall layout?
A grid of identical frames with aligned edges is the easiest to plan and hang, and it looks clean and modern.
How do I plan a gallery wall without drilling holes?
Cut paper templates, tape them up with painter’s tape and live with the layout for a day or two. Adjust it freely before you mark and drill.
Can I order matching custom frames online in Dubai?
Yes. Online photo framing in Dubai lets you choose the same frame, mount and glazing for every piece, set exact sizes for your layout and preview each design before ordering.
A good wall arrangement is mostly planning: choose a layout, set a single gap, size the group to the furniture and test everything on paper before you drill. Follow the steps, keep the frames consistent and your photographs will look deliberate, balanced and ready for years of visitors.